Coconut Rice with Spiralized Vegetables and Black Beans


coconut rice with spiralized vegetables and black beans | asavoryplate.com
having lots of vegetables prepped and waiting makes this so much easier

I am a morning person. I naturally rise earlier than most. I love the stillness of mornings and am thrilled by sunrises. But calling myself a morning person tends to lead to mistakes like thinking I can think about tomorrow’s lunch tomorrow morning rather than just planning and getting it ready tonight. On a groggy morning the only thing that saves me is a fridge with lots of prepped ingredients that can be assembled into different things.

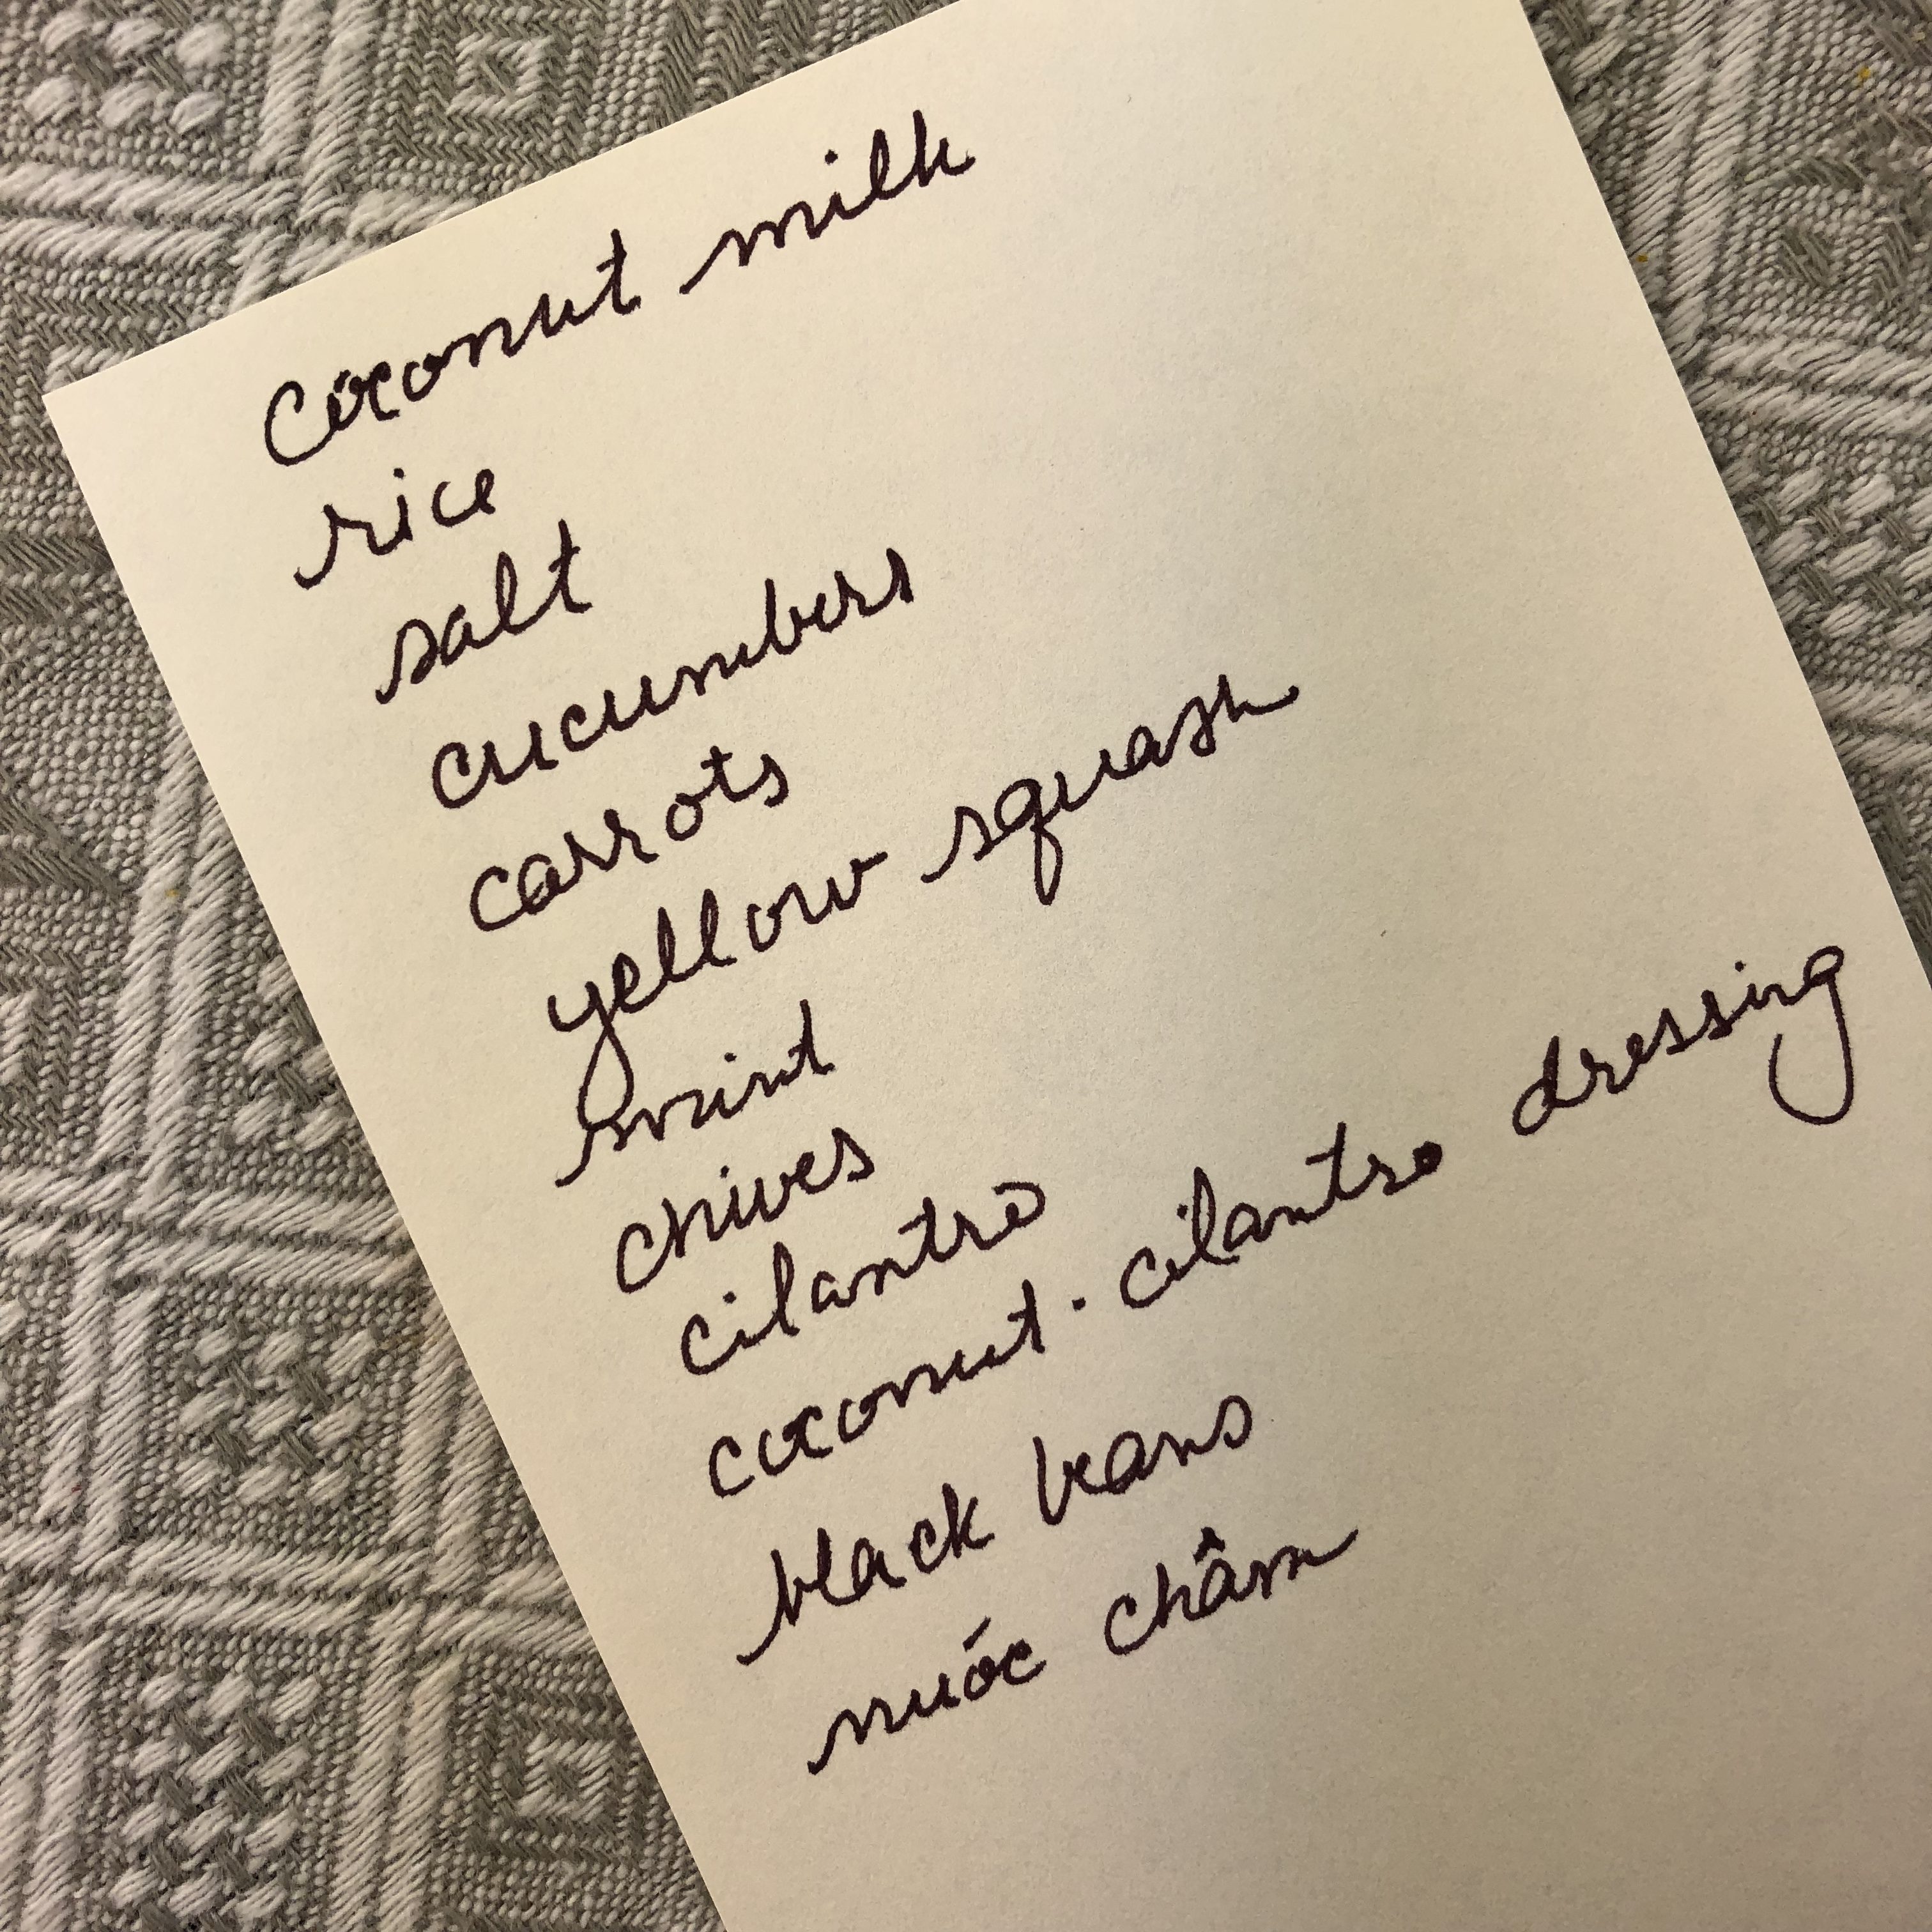
Instructions if you care to duplicate this dish: stumble into kitchen. Put one cup of rice and one cup of coconut milk along with a little salt in the instant Pot. Set on high pressure for six minutes and plan for 10 minutes of natural release before opening lid. Make sure the thingamajig on top is set to seal.

Meanwhile, pull out all the spiralized veg in the fridge from the last couple of days of spring rolls. Pack the cucumbers, yellow squash and carrots in a small weck jar. Note that you are finishing off the carrots and remember that you should look for fatter carrots next time – easier to spiralize. Dress the veg with the dregs of the bottle of nuóc châm and a splash of rice vinegar. Close jar and shake.

Coconut Rice with Spiralized Vegetables and Black Beans | asavoryplate.com
A workday is so much better with a great lunch to look forward to.

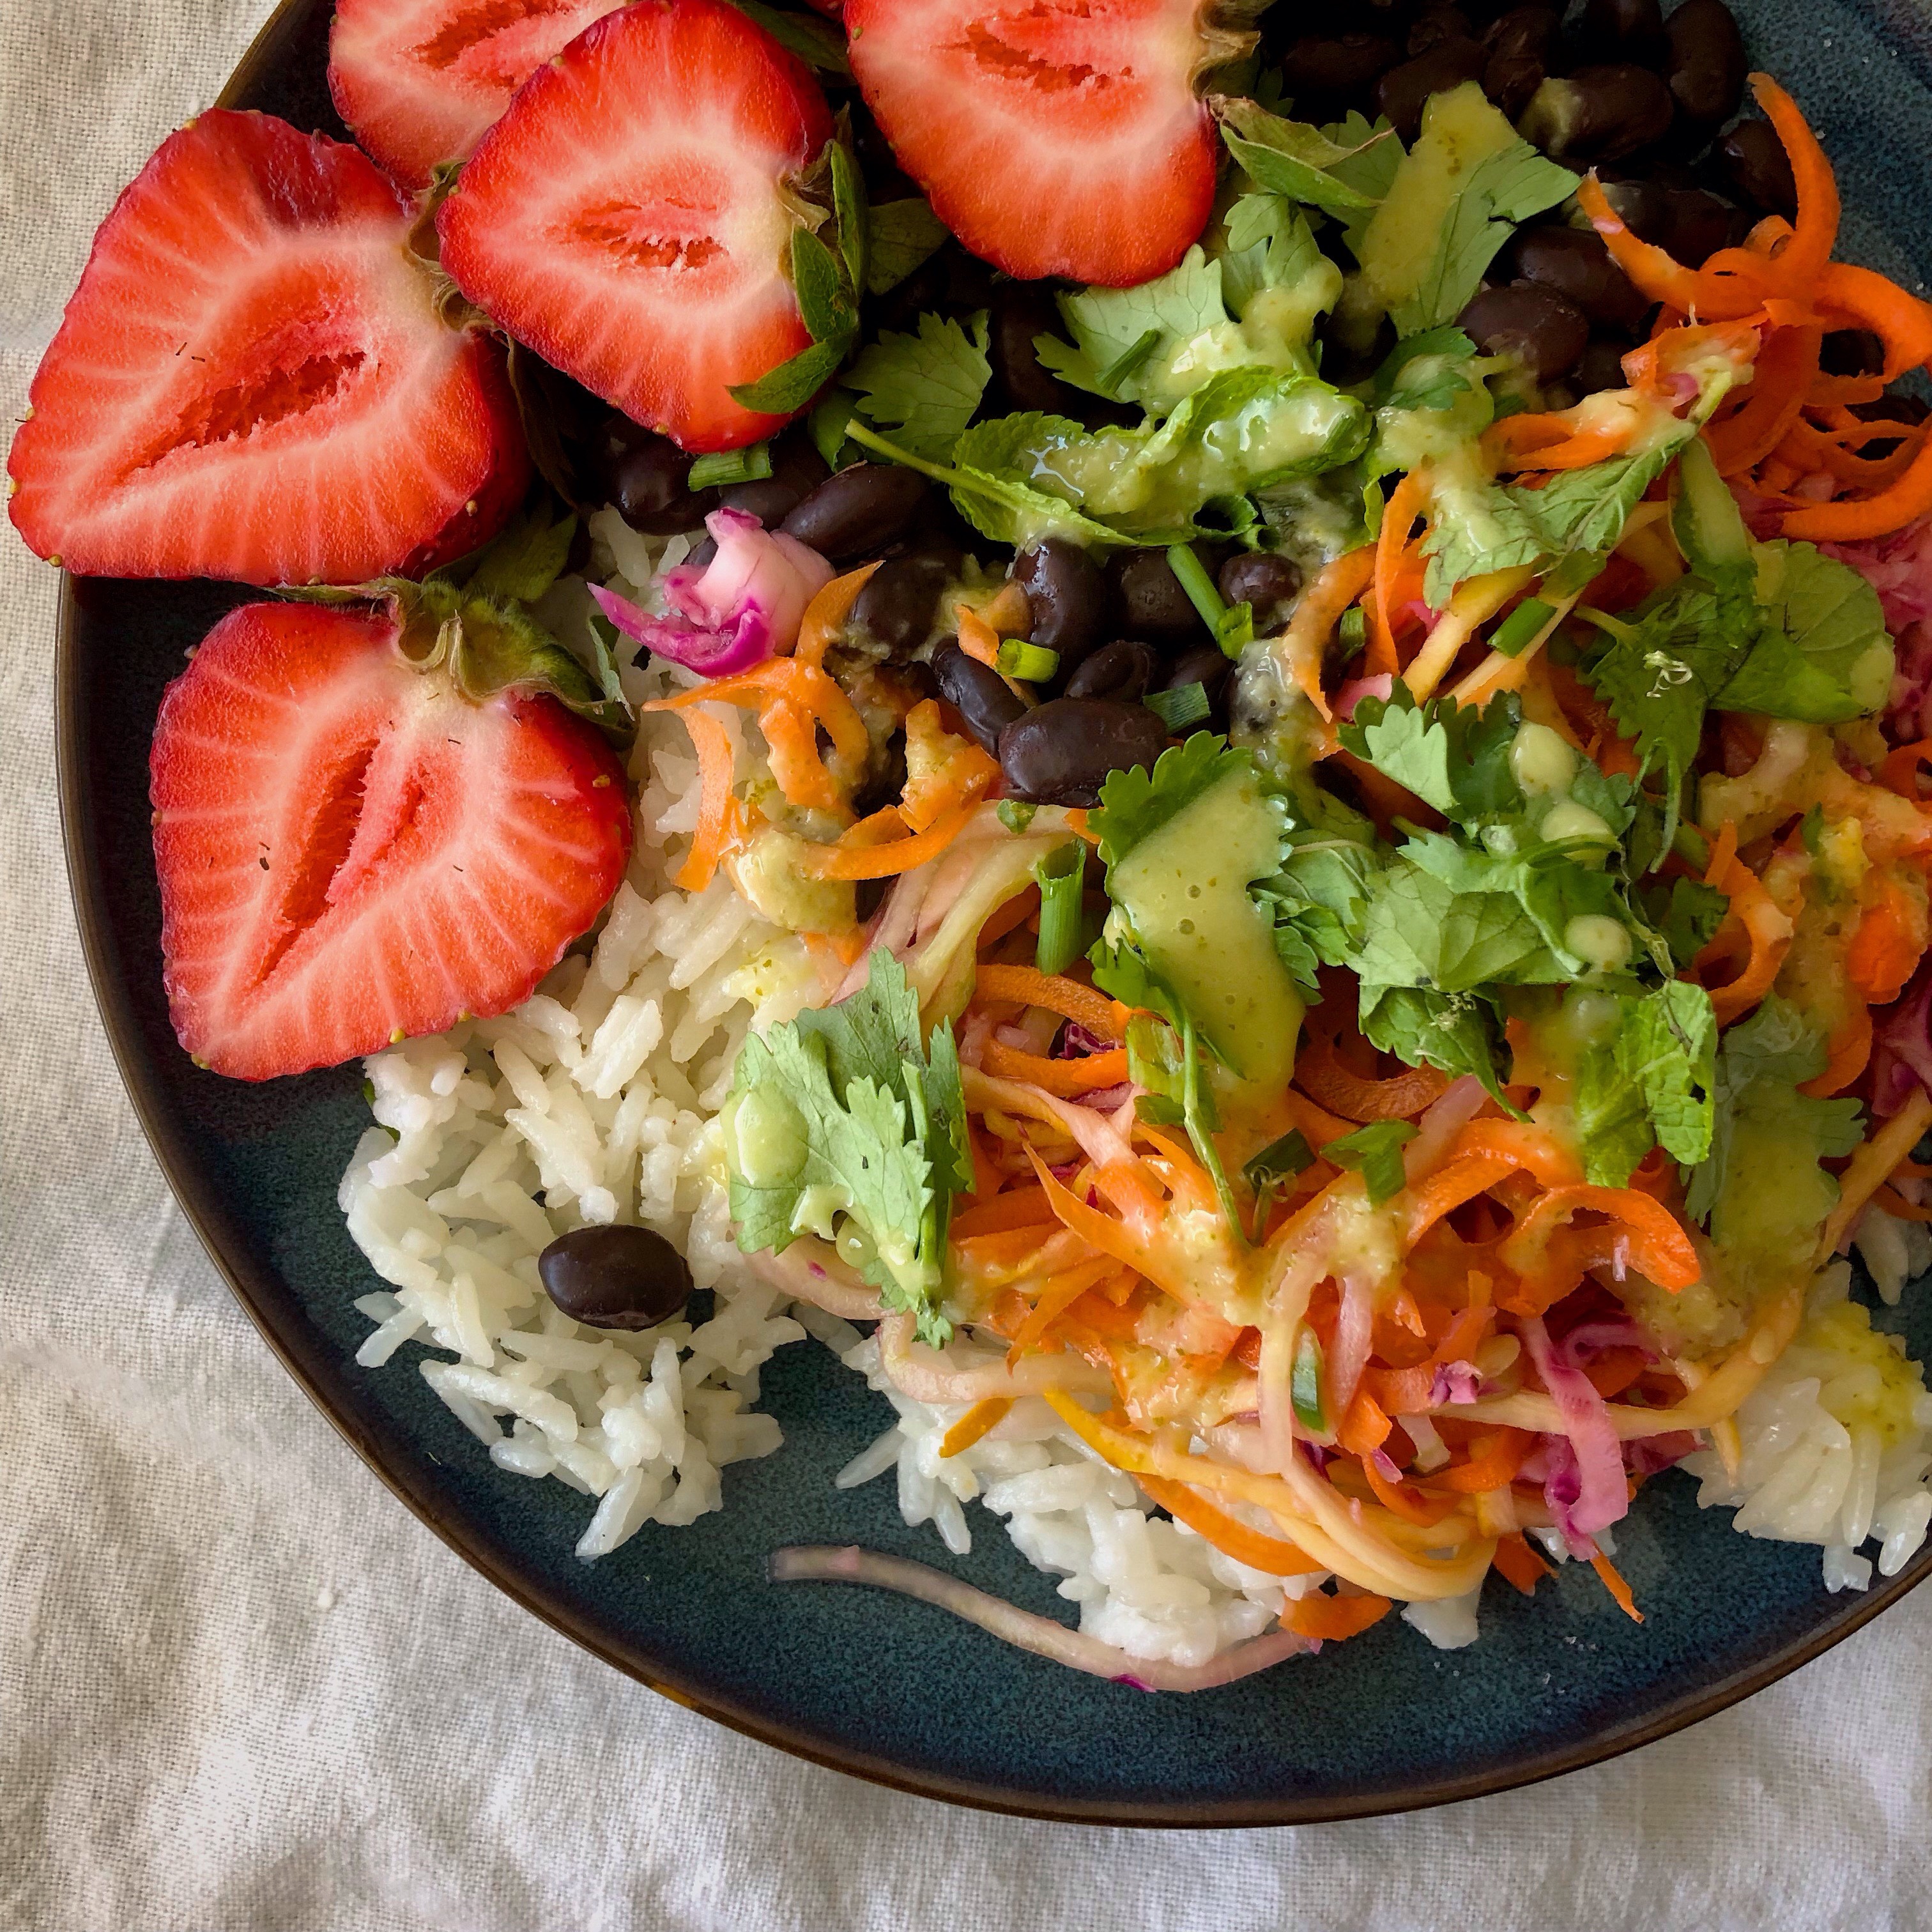
Snip herbs on hand – mint, chives, cilantro into small container. Pour a little coconut cilantro dressing left over from the Moosewood Restaurant Table African Grain Bowl recipe into a smaller container. Slice strawberries into container.

When complete, open instant Pot and taste rice. Decide to go for a bit more salt next time. Divide rice into single serving containers while realizing you eat rice too seldom to really know what a single serving ought to be.

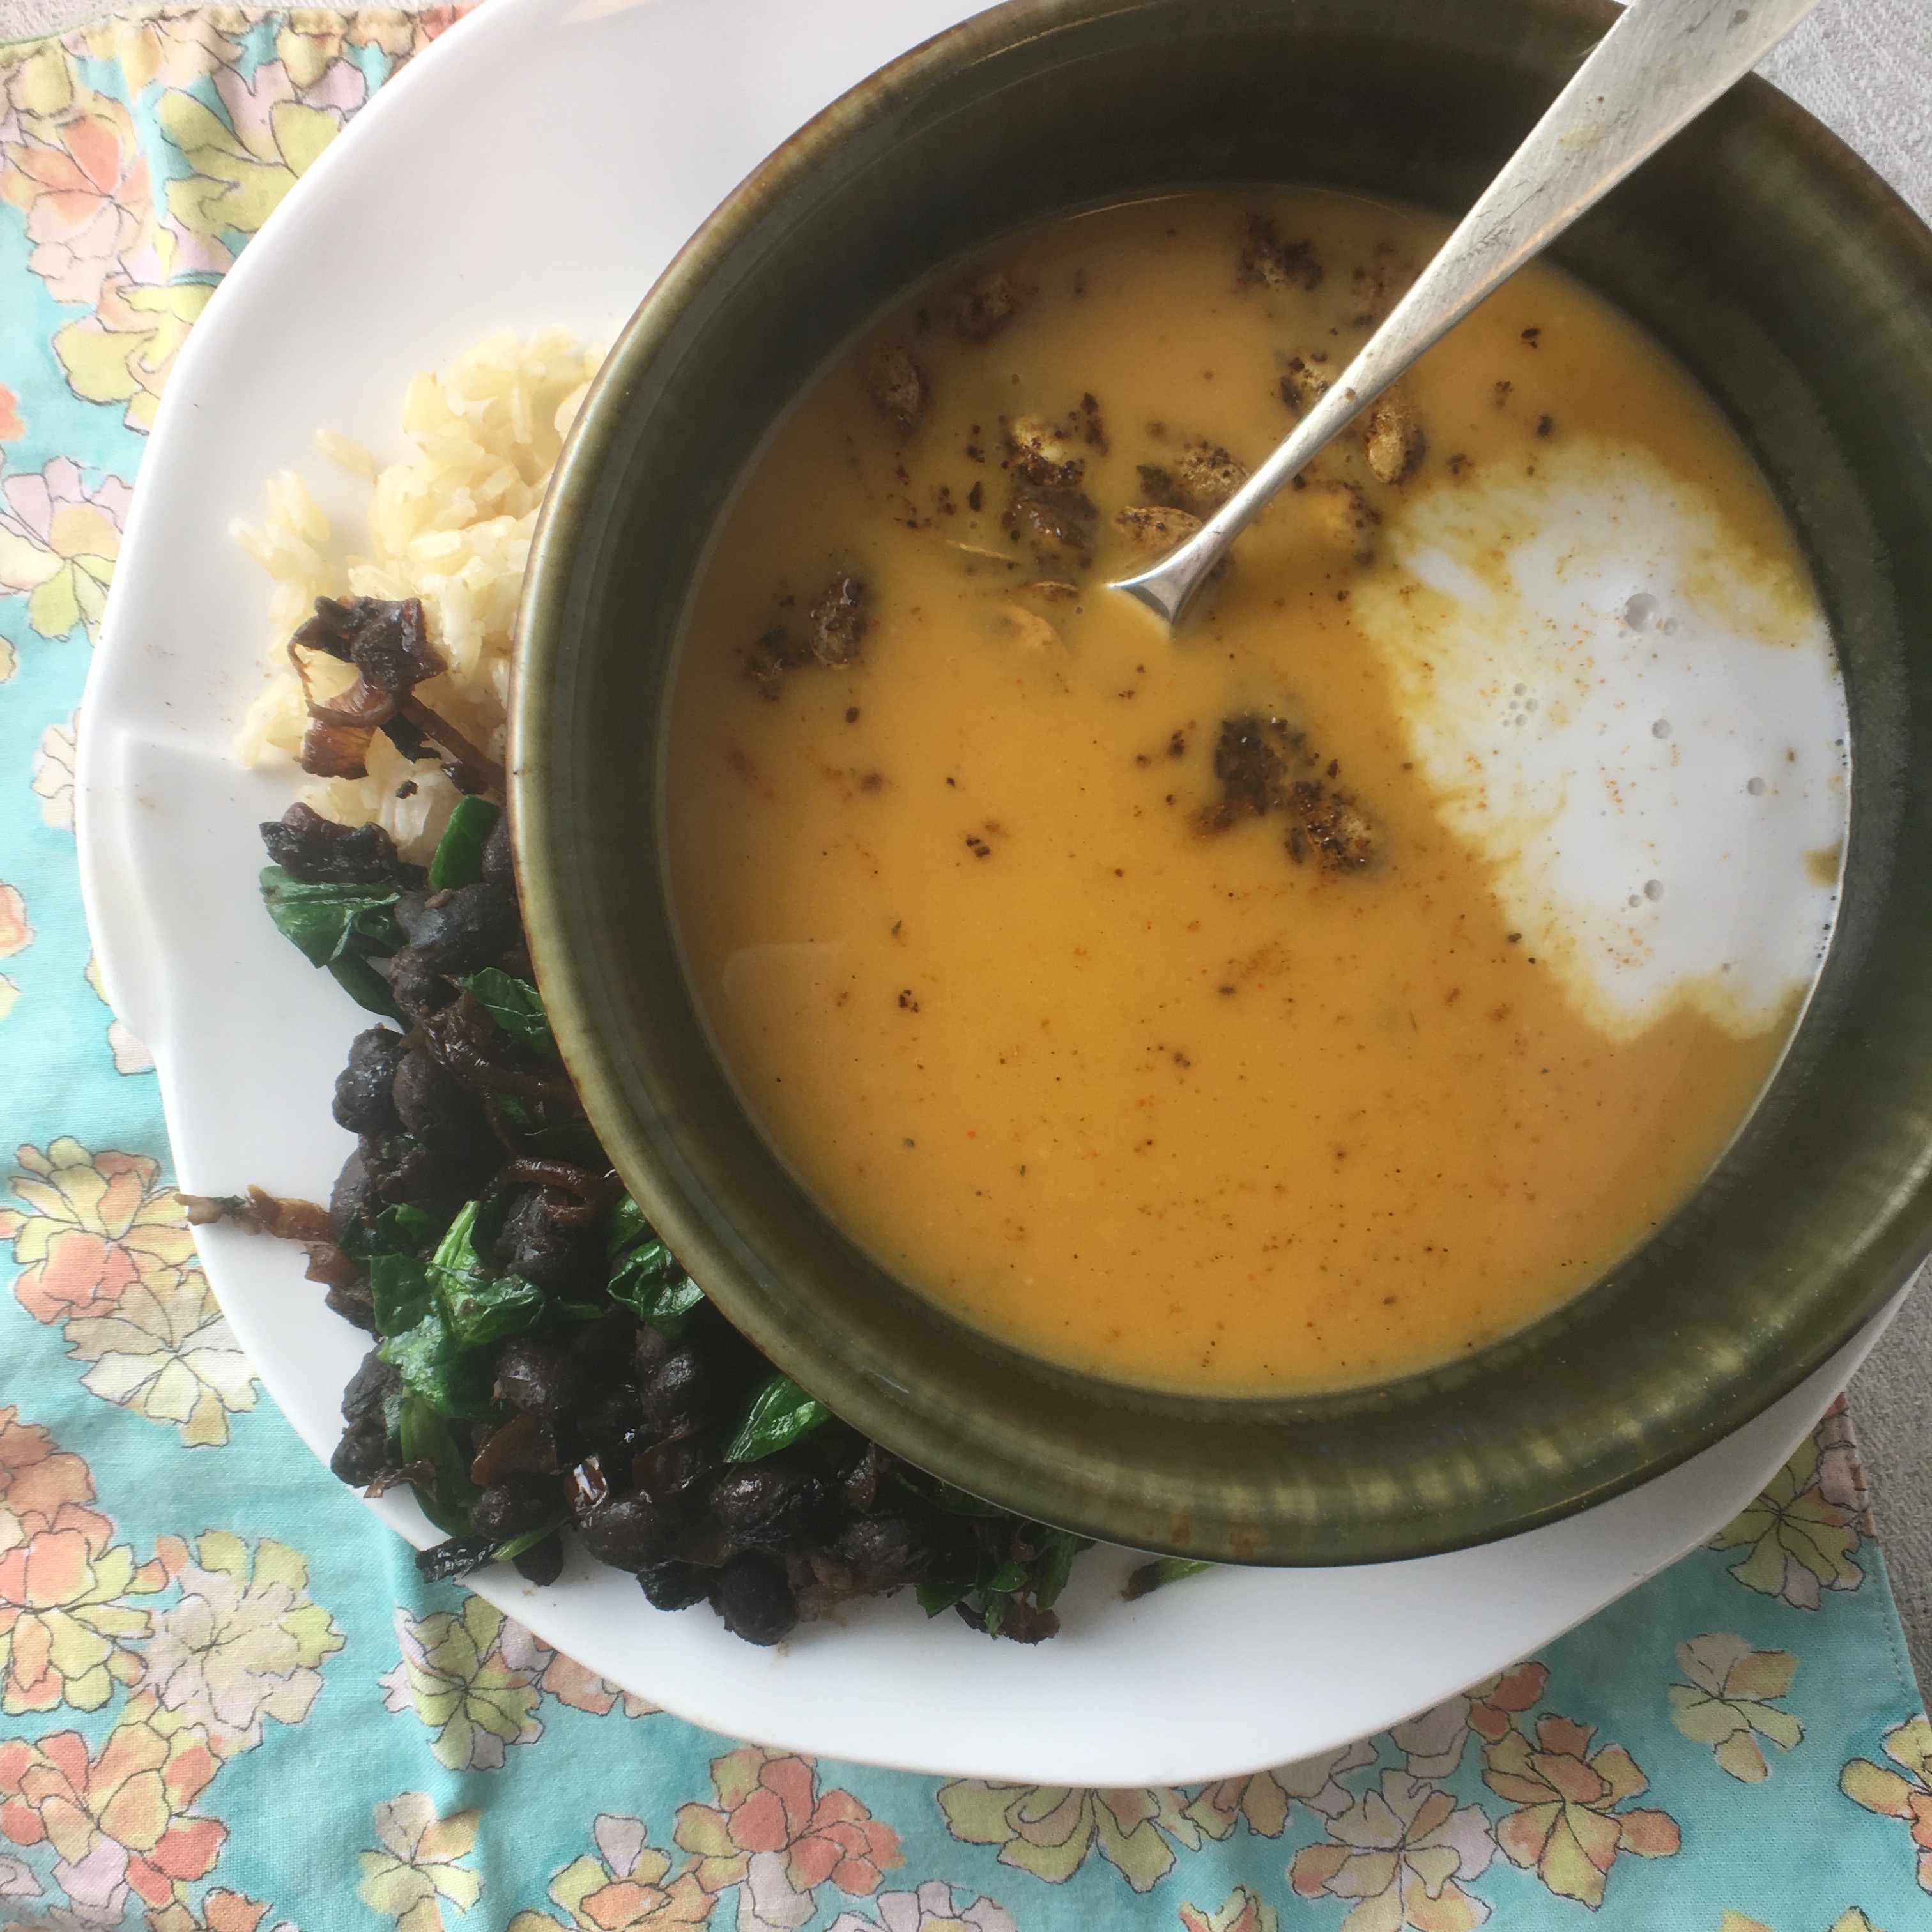
Go get dressed. Remember that you have neglected protein on this plate. Open a can of black beans and portion some out. Eat one bean. Decide to count on the flavors in everything else to
make up for the blandness of the beans. Decide that “the blandness of the beans” is as good a summation of bleakness as you can imagine.

At lunch, assemble plate. Realize that your coworkers are fully aware of this odd part of your life so you are free to take your plate to an empty conference room for a natural light #notsaddesklunch photo. Wonder idly if it is cheating to then eat it at your desk under the fluorescents.
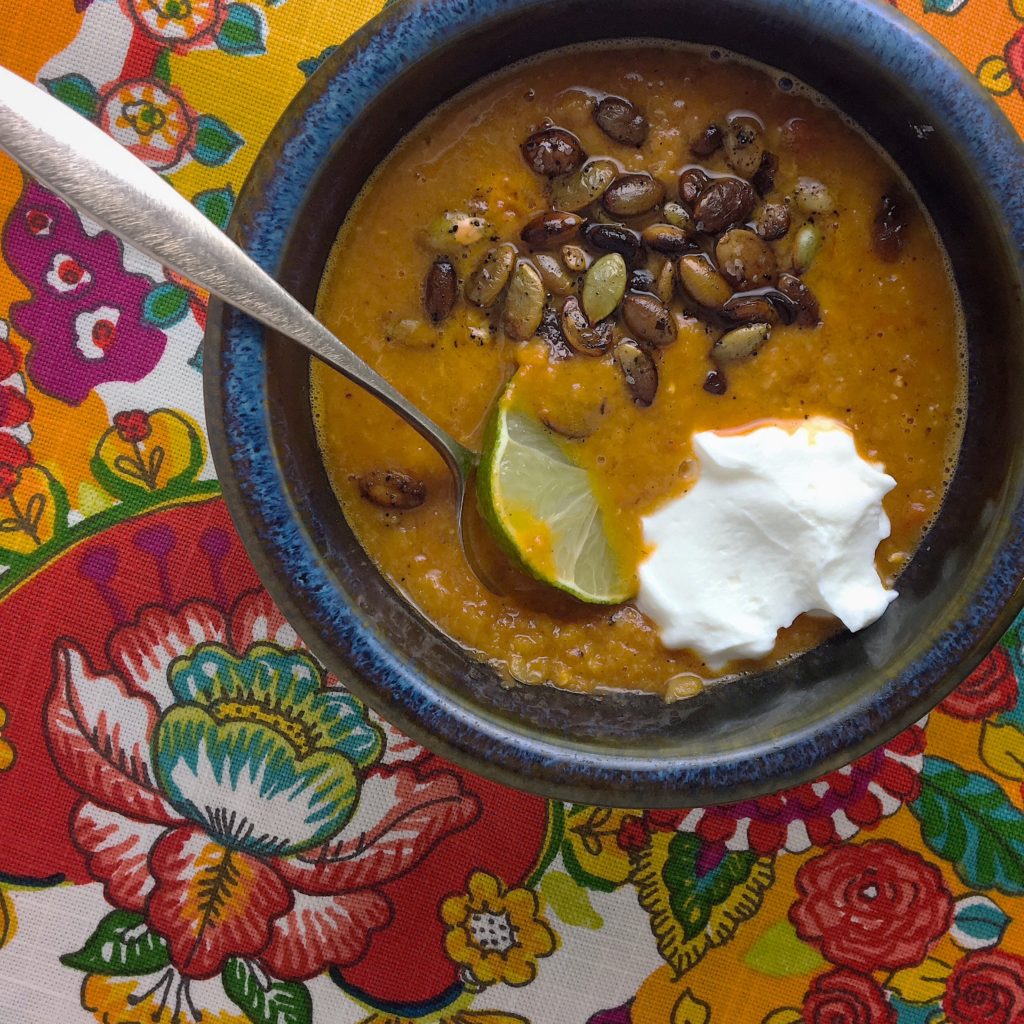
Serves 1. Gladly.

Lentil Soup with Coconut Milk and Saffron – Michelligatawny

Lentil soup | asavoryplate.com
ingredients

Lentil Soup with Coconut Milk and Saffron – Michelligatawny

Sometimes interesting things happen when working within limitations. A couple years ago I was cooking for a sick friend with a long list of food limitations and came up with this soup. She told me it reminded her of Mulligatawny so I’ve called it after her ever since: Michelligatawny.
lentil soup | asavoryplate.com
Lentil Soup with Coconut Milk, Saffron and Tofu


Recipes are like the Pirate code from Pirates of the Caribbean – more like guidelines anyway. That said, it helps to know why particular ingredients are chosen before deciding on substitutes. Most lentil soups I make are thick. They break down in the cooking process and absorb liquid – creating a stewy texture. This soup is more about the broth and so I chose French Green Lentils. They are better at holding their shape and not taking over the bowl. So if you choose a different lentil you will want to keep that in mind.

Every time I’ve served or been served a dish flavored with saffron someone will talk about how it is ‘the most expensive spice in the world. Please pretty please for me – will you cut that conversation off? It’s tedious. If you have to discuss the saffron let’s compare how much saffron you need to flavor a dish  to how much you need of one of my other favorite spices, dried dill weed. Pinches versus palmfuls. Or consider all the work needed to deliver it. Saffron delivers an awful lot of flavor for all it takes to get it to our tables. Maybe just enjoy that flavor without getting wrapped up in the dollars and cents.

Lentil Soup with Coconut Milk and Saffron – Michelligatawny

4-ish servings
one can of coconut milk
2 cups chicken stock
1/4 cup French Green Lentils
one cup diced onion
olive oil
2 tsp finely diced or grated ginger
1/2 a tsp fresh grated turmeric
pinch of saffron
1/2 cup diced tofu
salt to taste
Rinse and cook the lentils, simmering in the chicken stock (and a pinch of salt if the stock is unsalted) until tender – 20-30 minutes. Meanwhile, sauté the onions in olive oil until soft. Add the ginger and cook through.
When the lentils are done cooking, drain and return to the pot. Add the onions and ginger along with the turmeric,  saffron, coconut milk and tofu. Cook over medium heat until heated through. Taste and add salt if needed.

nondairy milk at home

Jump to the recipes

Stop me if this is a story you already know: my stomach and milk do not get along at all. Years ago when I finally gave up on milk I started my nondairy milk substitute journey with soy milk (and who knew it would be a journey?). Then I switched to almond milk. Lately I’ve been eying the other options in the case – cashew and coconut mostly. But sometimes I eye the price tag and get annoyed. Or take a look at the ingredients list and get annoyed. Those days I often go home and make my own.

nondairy milk | asavoryplate.com
making nondairy milk at home

Reasons to make your nondairy at home:

1 You know what you’re getting – more of the good stuff (commercially prepared almond milk contains very few actual almonds) and less of the bad stuff (who needs fillers?)

2 Convenience – that moment after dinner when you realize you have nothing to make your morning oatmeal with and you. just. do. not. want. to go grocery shopping? I almost always have the right ingredients on hand for some version of this alternative milk.

3 Taste – ’nuff said.

4 Cost –  Homemade almond or cashew milk is more expensive than store-bought. But homemade oat or rice milk is crazy cheap. I use a blend to get the benefits of the protein in the nuts as well as the benefits of the frugal oats and rice.

5 Customizability – this is the reason I first learned to make almond milk. I wanted to give a friend with thyroid cancer an option for when she had to go iodine free. You can shift up the amount of salt or play around with ratios of almonds to oat – whatever your nondairy heart desires. I love that if I don’t feel like going to the trouble to cook and cool rice I don’t have to include it in my blend. Or if I don’t have enough cashews I can stick with almond. The list goes on.

Also – I love the pretty bottles of alternative milk in my fridge.

Reasons not to make your own nondairy milk:

1 Convenience – for me the grocery store trip is close enough that if I can drag myself to the car it’s as fast to just pick up the milk there – and that’s if you only count the active work time on the recipe.

2 Convenience (again)- I find using a nut bag or cheesecloth to strain the milk to be ridiculously tedious. So I don’t. I put it through a fine mesh strainer once or twice and deal with a little graininess at the bottom. Your mileage may vary. (This doesn’t apply to cashew milk, by the way. Cashew milk does not need to be strained.) If you want super smooth milk, it will be high maintenance to make at home – you might want to stick with store-bought.

3 Cost – If you are dead set on nut milks only (and don’t mind that you’re not getting very much in the way of actual nuts in your nut milk) store-bought is a better deal.

So, there are plenty of reasons to stick with your store-bought almond milk. And plenty to try making it at home. It’s not like this is a lifetime choice. Make the homemade stuff sometimes, buy the store-bought stuff sometimes. That’s how I roll.

Since I tend to do a blend of Almond, Oat, Cashew and Rice I’ve been trying for ages to come up with a name that plays on the first lettters of each. But I have too many pronounceable options and none of them sits quite right! Should it be ACRO milk? ROCA milk? ARCO, RACO, COAR? I think I lean most towards CORA milk – but I’m still not settled on it. What do you think?

If you want to give it a shot here are some basic directions. Adjust the details (salt, flavorings) to your liking. Many recipes call for dates to give a little bit of sweetness to your alt milk. I use raisins instead since they are such a staple in my kitchen.

Almond milk:
1/2 cup almonds
Soak in water overnight. Drain and puree in 2 cups of water with a pinch of salt and a few raisins.
Strain, add a little vanilla extract and chill.
Oat milk:
3/4 cup steel cut oats
Soak in water overnight. Drain and puree in 2 1/4 cups of water with a pinch of salt and a few raisins.
Strain, add a little vanilla extract and chill.
Cashew milk:
3/4 cup cashews
Soak in water overnight. Drain and puree in 2 1/2 cups of water with a pinch of salt.
Do not strain. Add a little vanilla extract and chill.
Rice milk:
1/2 cup brown rice (I use brown jasmine as that is the standard brown rice I keep on hand)
Cook. Cool. Puree with 2 cups of water, a pinch of salt and a few raisins.
Strain, add a little vanilla extract and chill.

Butternut Squash Soup

There is something about having at least one ingredient prepped  that makes me about 10x more likely to cook after a long day of work instead of looking at a list of unassembled ingredients and deciding to pop some popcorn for dinner (not that, um, I would EVER do that.) On Sunday I tossed a butternut squash in the Instant Pot treatment (one cup of salted water, six minutes on high with manual release) while I made dinner. I also cleaned and gave its seeds about an hour in the oven on 200 degrees to dry them out. And so, having given myself just that little bit of momentum, this Monday night meal came together nicely.
asavoryplate.com|butternut squash soup
Butternut Squash garnished with Spiced Butternut Seeds
This soup was intended to be my sister’s recipe, one that takes dairy cream and is livened up with apple juice. But when I forgot to pick up the cream and remembered I had coconut cream I decided to go a different direction. As with all my ‘recipes’ you’ll want to adjust to your liking. I cook for one and buy the smallest butternut squash I can find in the pile. If you’re cooking for a family and picked out the larger squash you’ll want to taste and adjust as you go.

Not-exactly-my-sister’s Butternut Squash Soup

4-ish servings
half an onion, diced
1 clove garlic, diced
red curry powder to taste
olive oil
one not very large butternut squash, peeled and cut and precooked if possible
2 cups chicken stock
half a can of coconut cream
one lime
salt to taste
lime juice to taste (optional)
In a heavy bottomed pan, heat your favorite sauté oil – I used olive oil and a smidge of butter. Sauté the onions until fragrant. Add the garlic and continue cooking for a minute or so. Add the curry powder and sauté til fragrant.
Add the chicken stock and the butternut squash. Bring to a boil and then reduce heat to a simmer til tender. If you haven’t had a chance to pre-cook the squash this will take longer but still work just fine.
While the soup is simmering, zest and supreme the lime. Once the squash is tender, add the zest and lime. Using an immersion blender, puree the soup thoroughly. Add the coconut cream. Heat thoroughly.
Taste and add curry powder or salt to taste. The coconut cream and butternut squash combo might be a tad too sweet. If so a splash of bottled lime juice will balance things out. 

Spiced Butternut Seeds

seeds from the butternut squash, washed and dried (200 for an hour should do it)
olive oil
ground cumin
ground coriander
salt
black pepper
Toss the seeds with just enough olive oil to coat. Add the cumin, coriander, salt and pepper to taste. Bake in oven at 350 until crisp, about 30 minutes.

Soup Season

I feel like in January soups and salads battle it out for prominence on our plates. Salads because so many of us are looking to balance out the overindulgence of the holidays. And soups because, well, nothing is better for balancing out the cold weather. For me, soups have to win hands down. After all I can eat a salad any day of the year. But I’m not going to go for a hot bowl of lentil soup in the heat of July. I embrace soup season wholeheartedly.

This soup from the New York Times has been a staple in my kitchen since it was published in 2008. I love it for its pantry friendly ingredients list, its freezer-friendliness and its easy set and forget nature. I like to top it with toasted spiced pumpkin seeds. Or a dollop of yogurt. Or lots of cilantro. What will be your favorite garnish? Find the recipe here.

Red Lentil Soup with Lemon | asavoryplate.com
A little soup season perfection

Roasted Carrots with Cumin, Coriander and Fried Shallots

Roasted carrots with cumin, coriander, and fried shallots

I was heading to a potluck church friendsgiving. I had signed up to bring a fruit or vegetable side. And I promised myself it would be a storebought dish. I’d quickly stop and grab something at Fresh Market before squeezing in a run before the dinner. Instead I started thinking Fall and carrots and cumin and suddenly I was in the produce section instead of the prepared food section. The run didn’t happen but the carrots sure turned out tasty!!


4 bunches carrots

1 t cumin seed

2 t coriander seed

1 large shallot, sliced

4 T butter

Preheat oven to 500° with rimmed baking sheets on the bottom rack.
Scrub carrots and remove tops if present. Heat a small heavy skillet. Add the cumin and coriander to the hot skillet. Toast until fragrant, stirring occasionally and watching closely not to burn. Remove from skillet and grind. Set aside.
Melt the butter. Stir in ground spices and heat through.
Arrange carrots in a single layer on the preheated baking sheets. Brush with the spiced butter. Roast for 12-18 minutes.
Meanwhile, heat a half inch of neutral oil in a small pan til sizzling. Fry the shallot slices until golden. Drain on a paper towel. Sprinkle over the carrots just before serving.

potluck grain salad

potluck grain salad ingredients
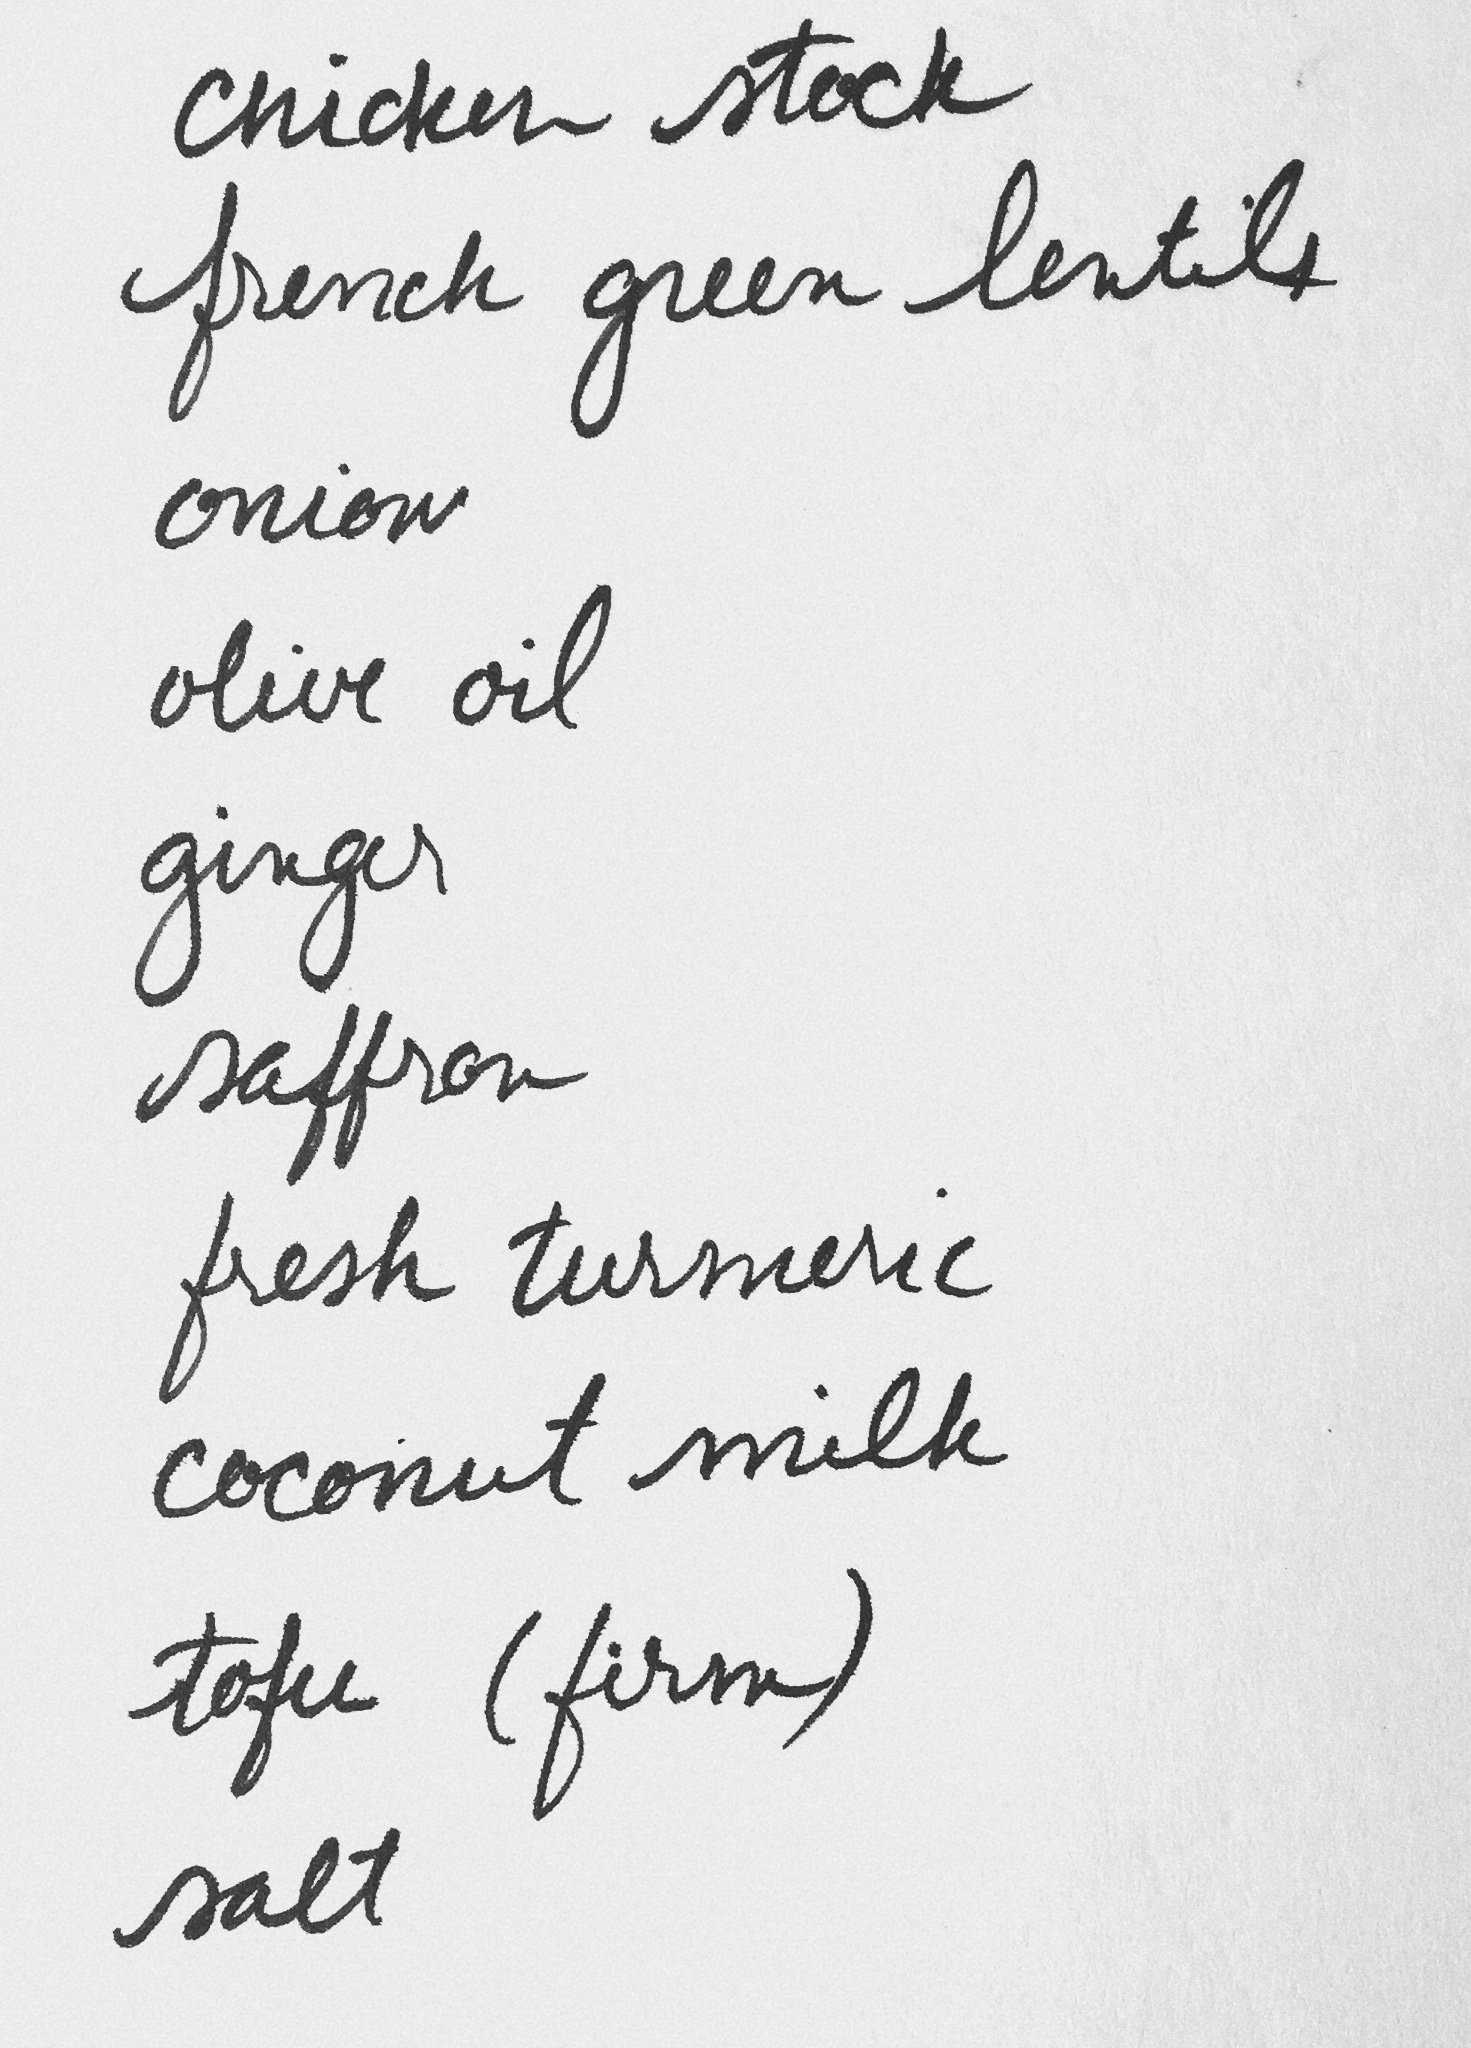
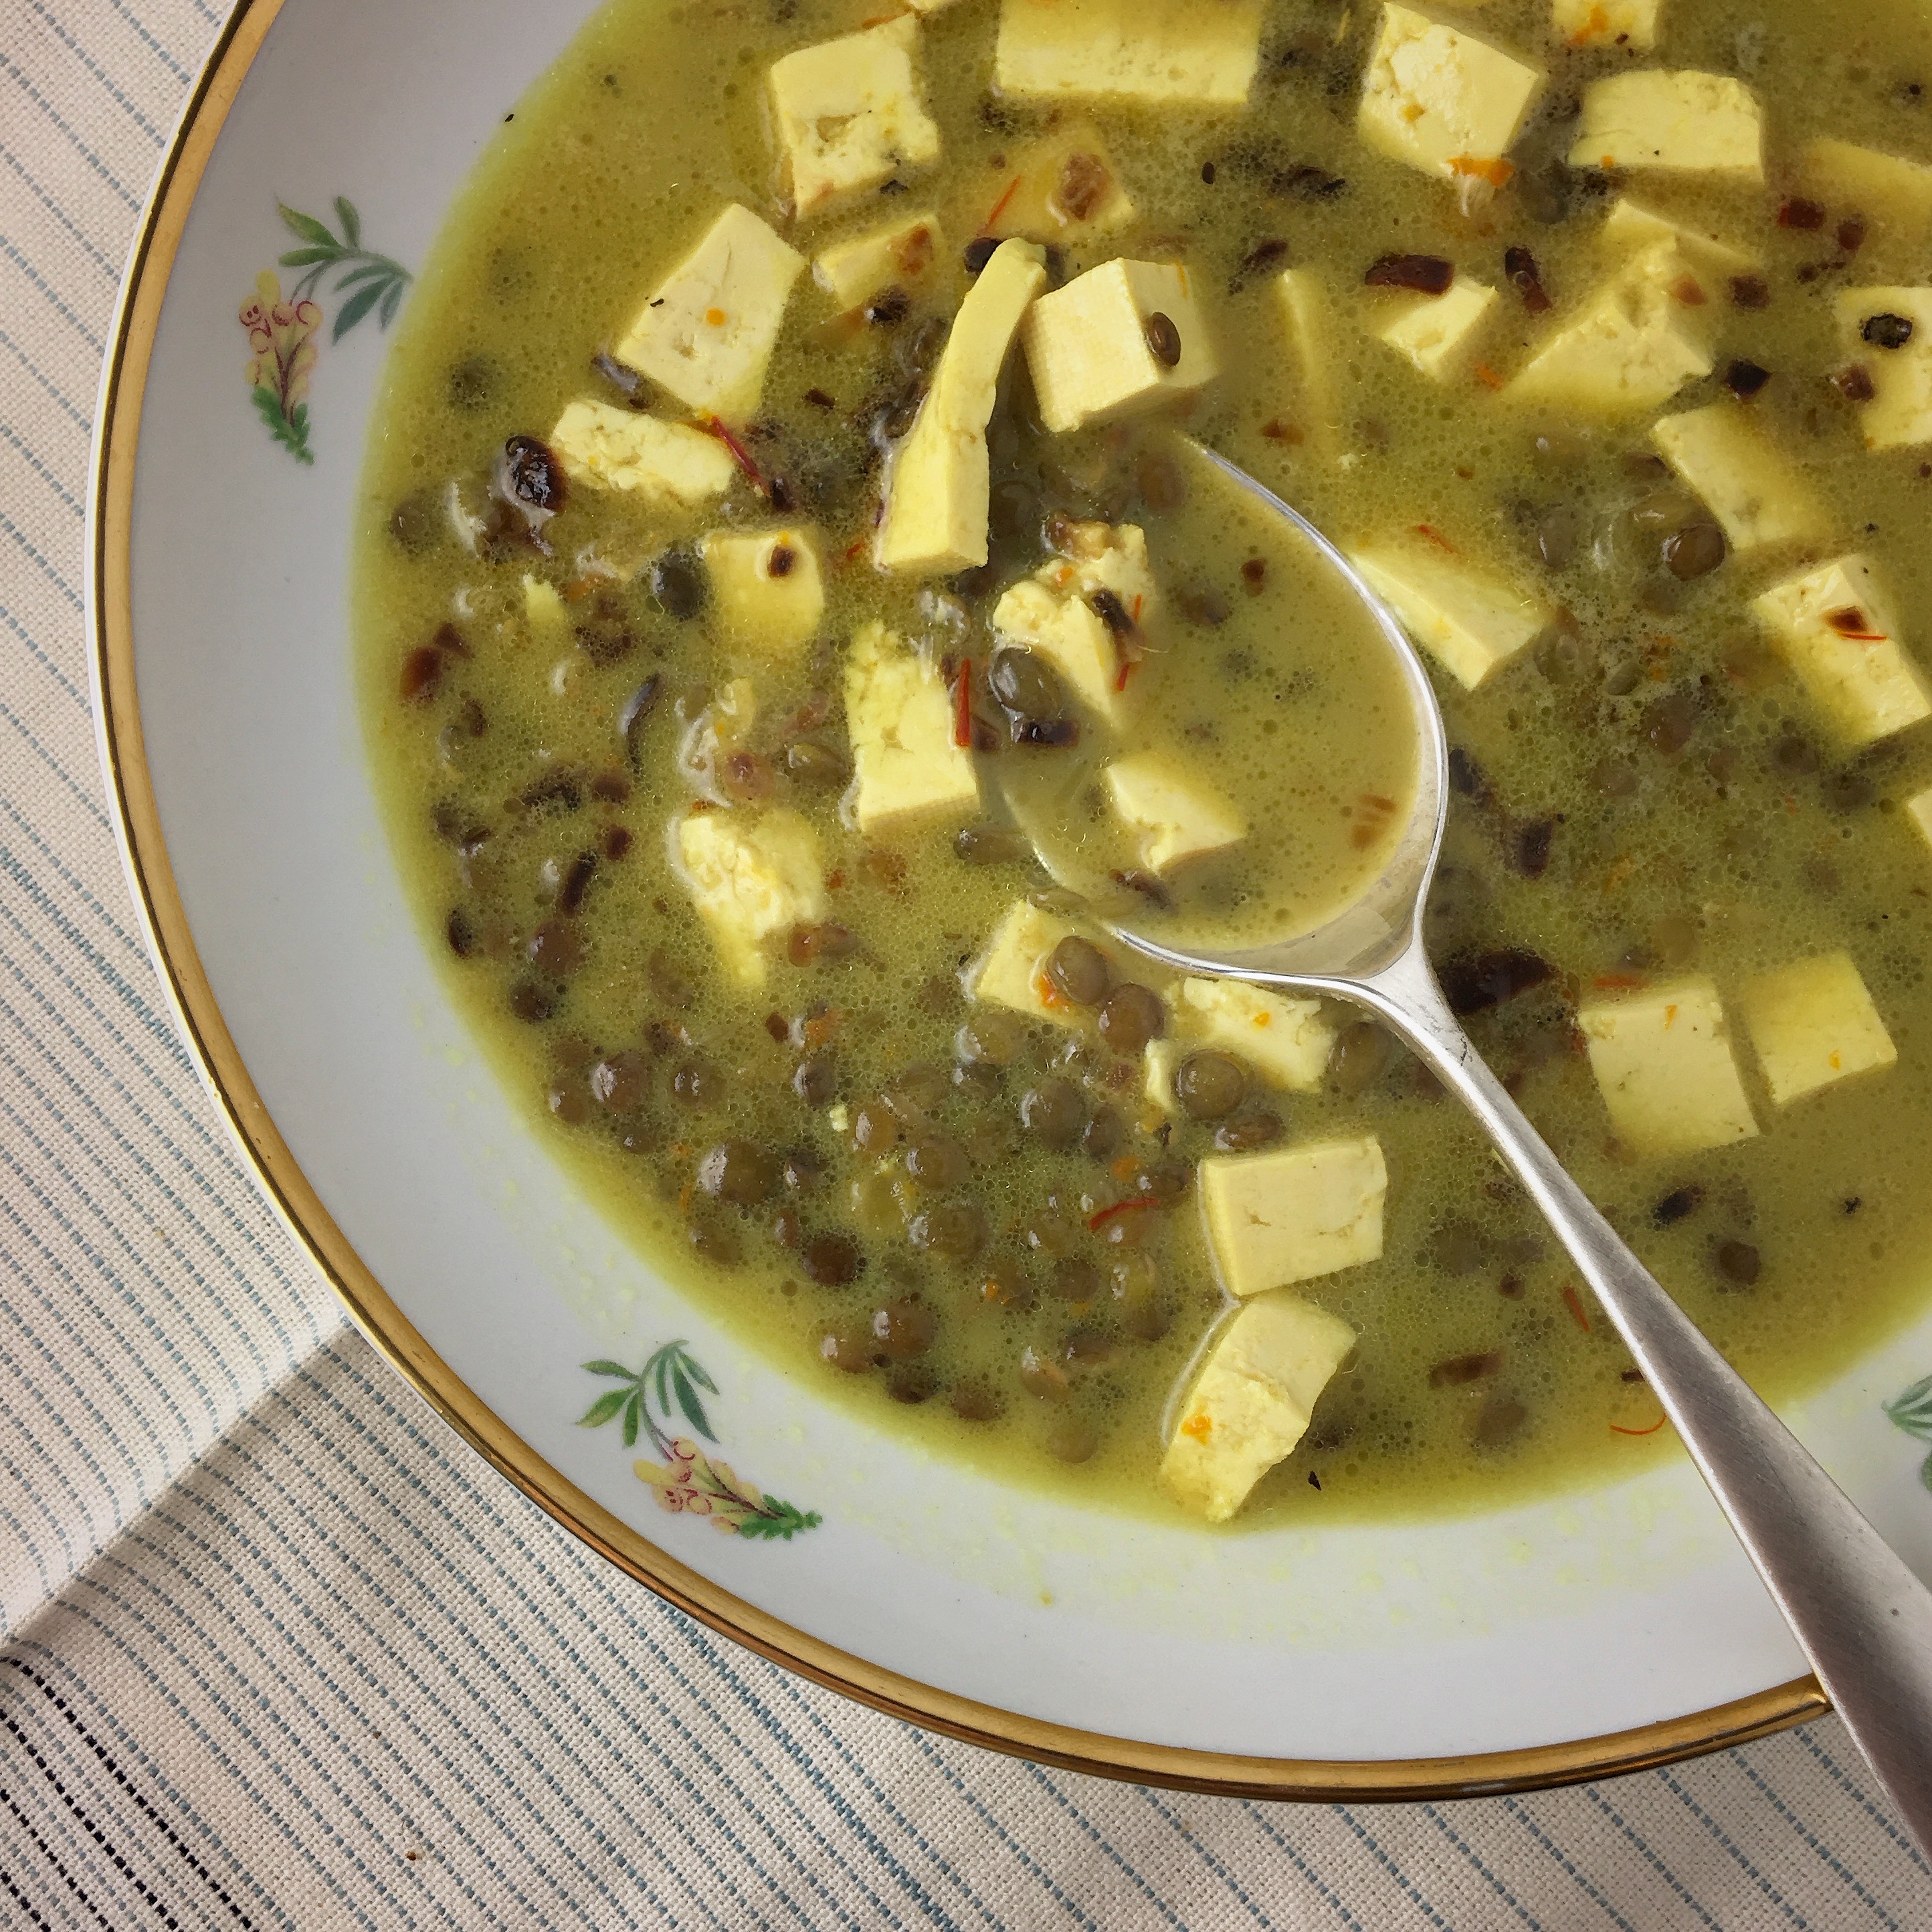
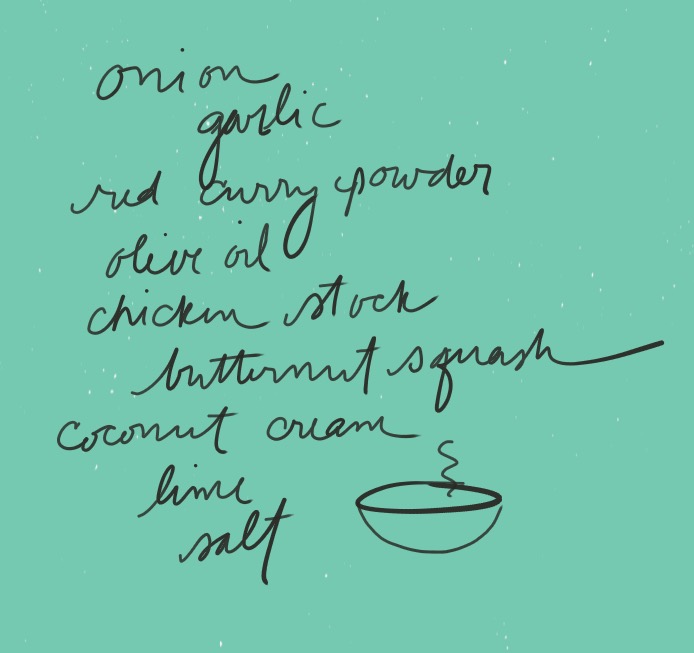
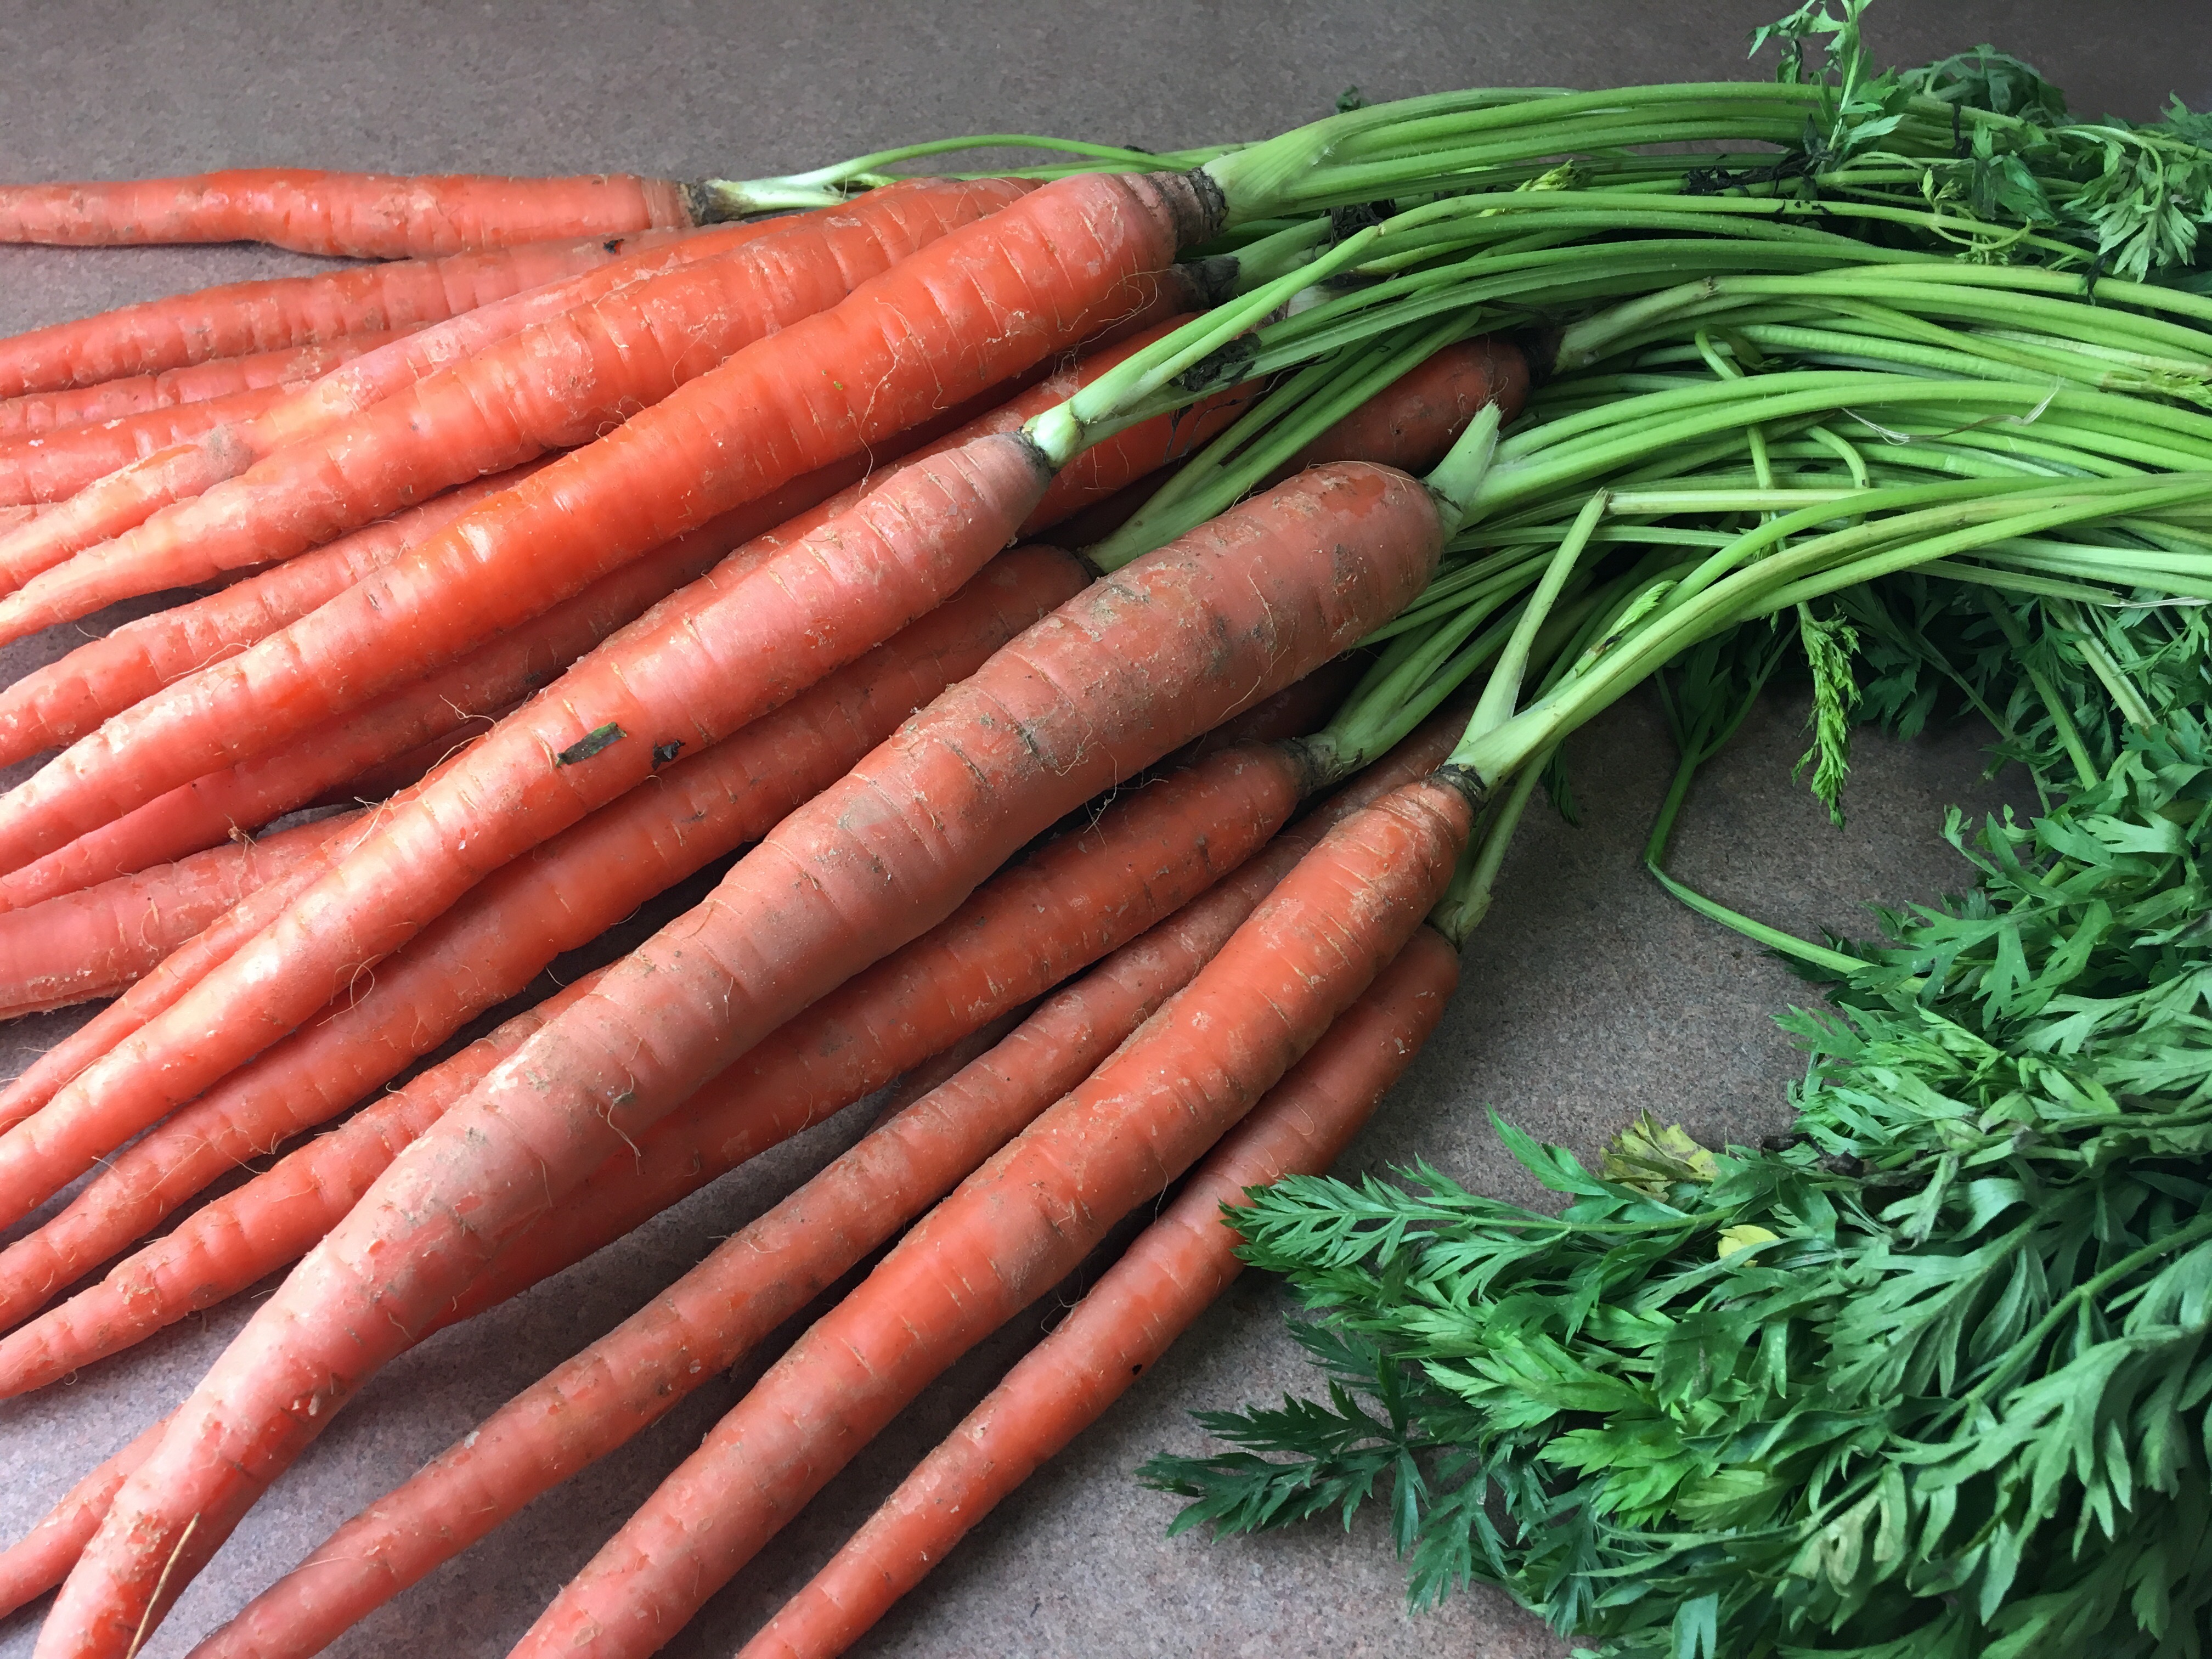
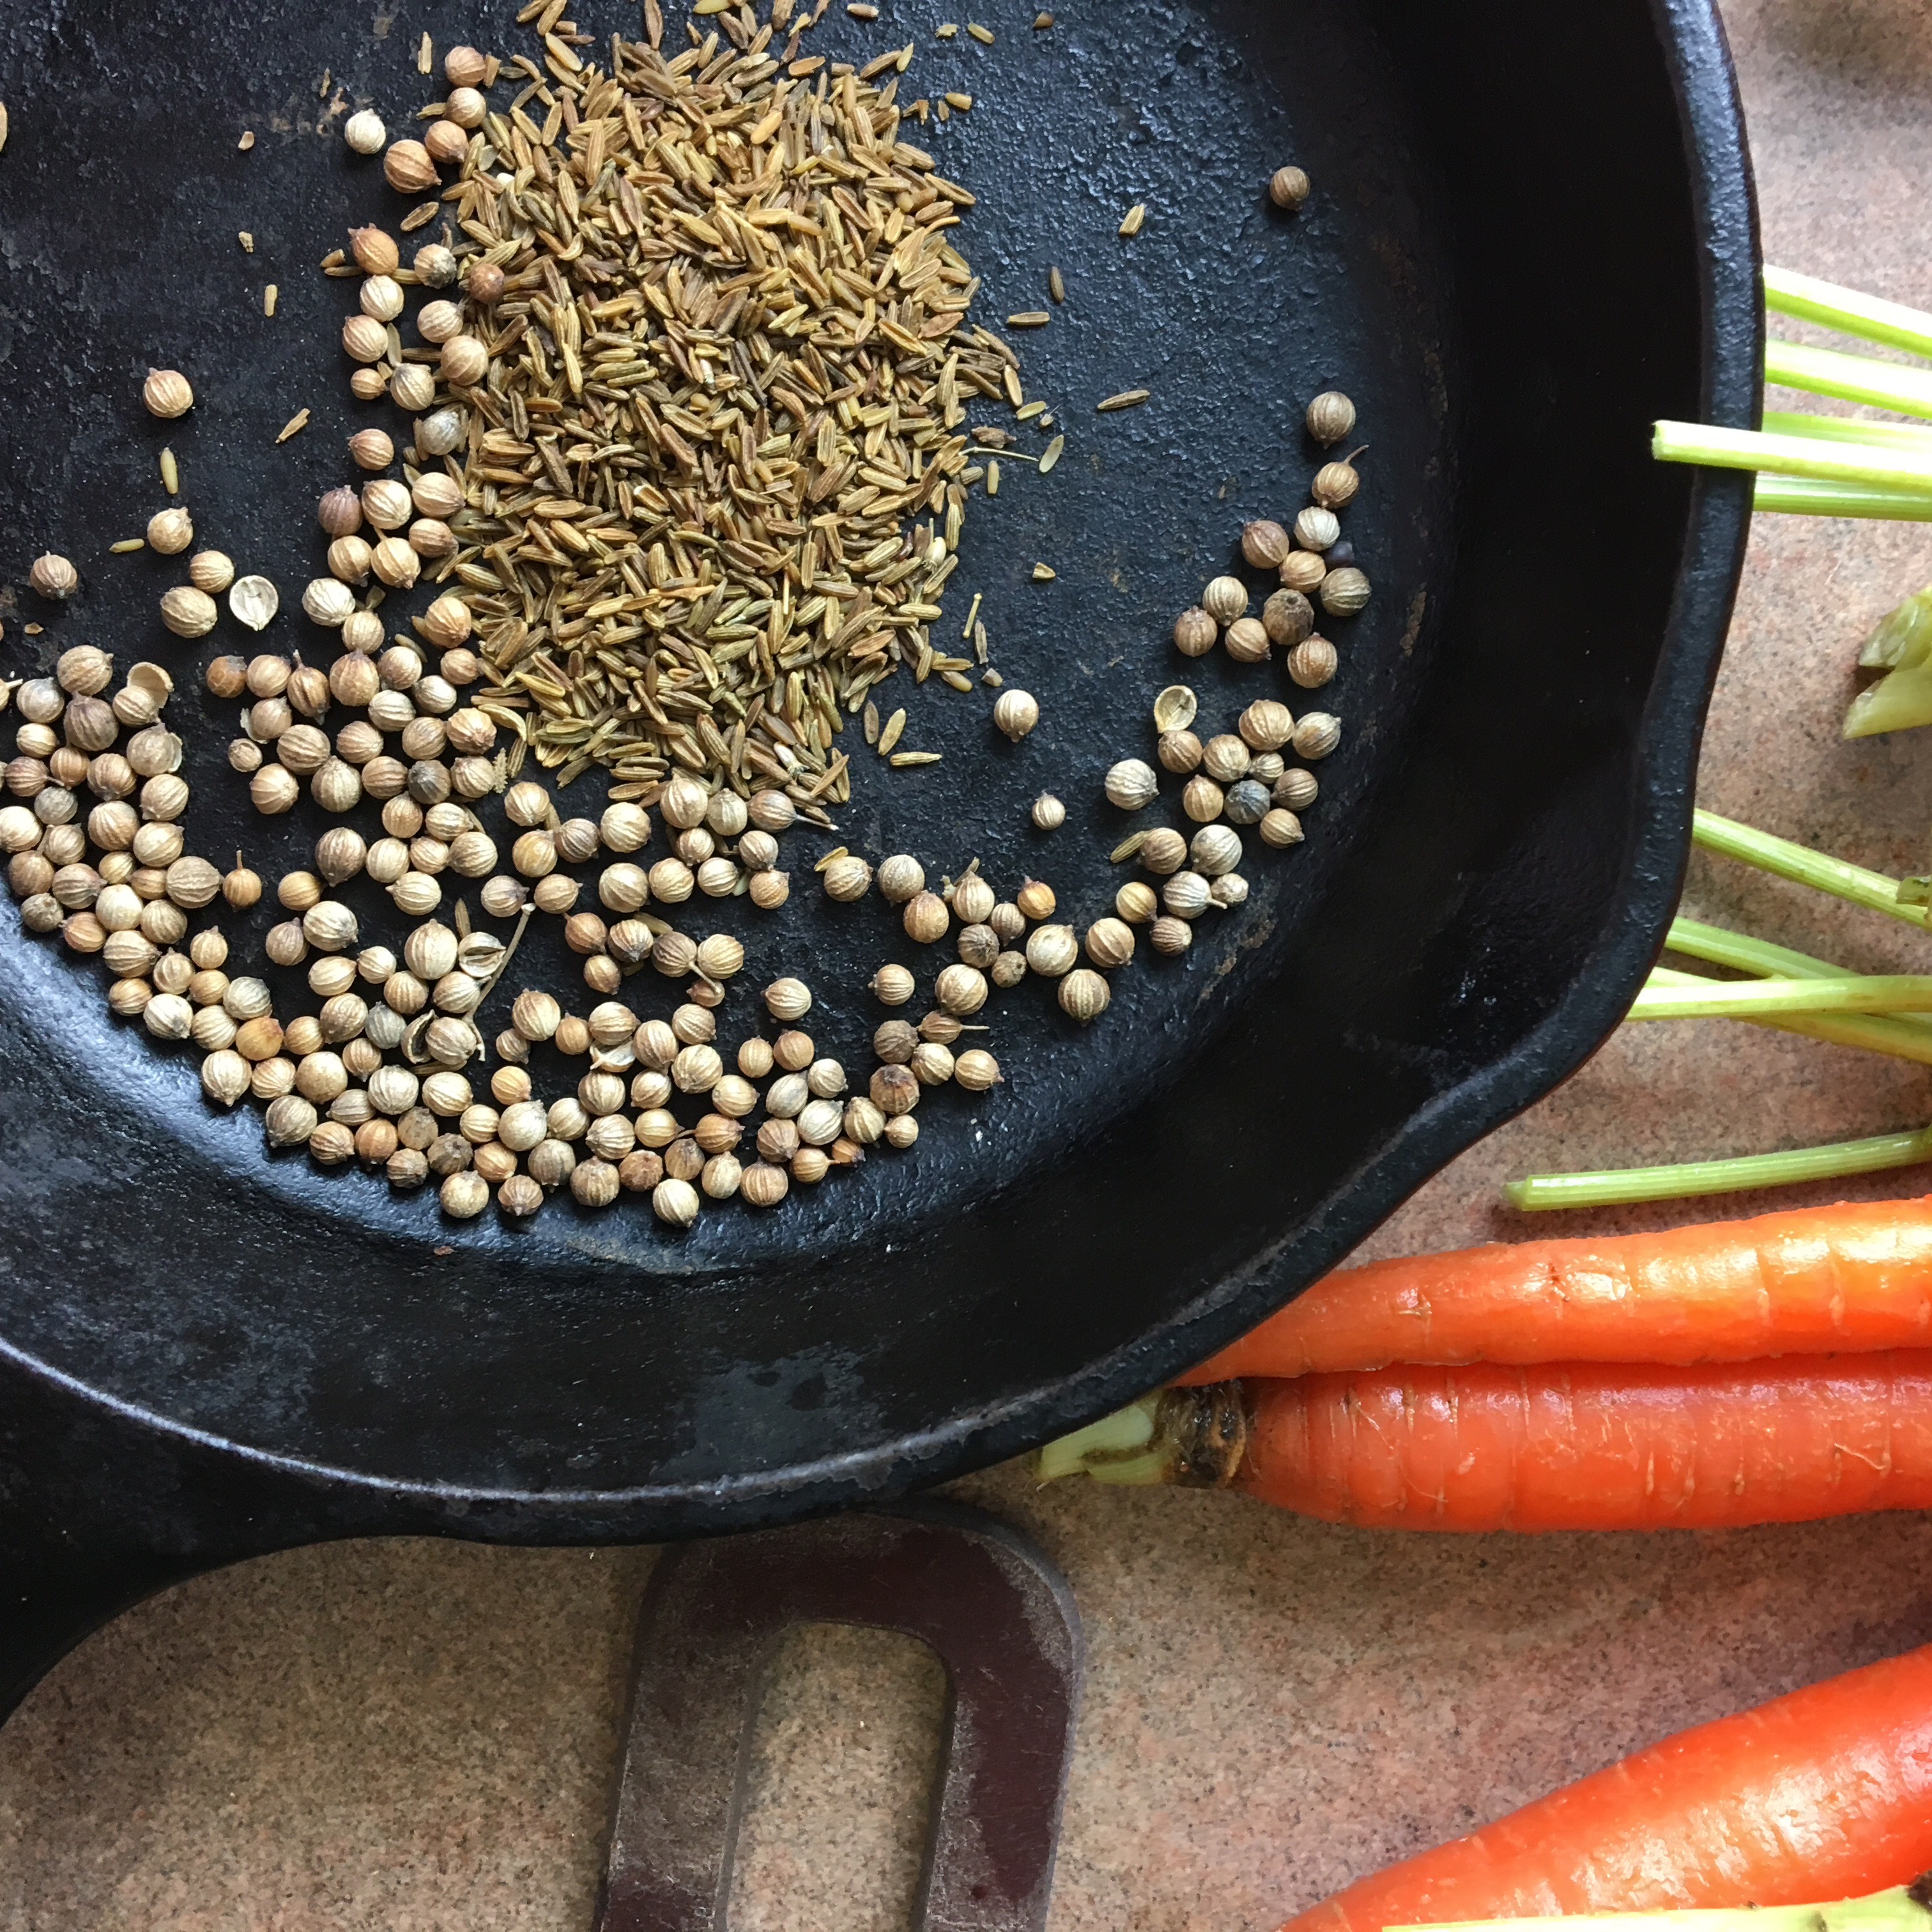
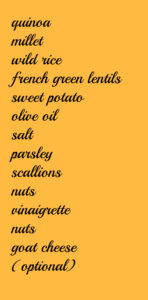
This is a great side dish for potlucks when you want to offer a healthier option than the usual chips and dip. Without the optional goat cheese it even qualifies as vegan (though if your friends are as carnivorous as mine I wouldn’t recommend announcing that as you arrive at the potluck). It holds up really well in the fridge for leftovers the following day or two, which helps make up for the fact that with all the cooking and cooling it does require plenty of plan-ahead time and multiple pots and pans.

If you want to serve this as a one-dish meal add diced avocado (sticking with the plant-centric theme) or diced chicken. But if you’re expecting leftovers, serve the avocado on the side rather than mixing it in.

Potluck grain salad | asavoryplate.com
Potluck grain salad

A word about salads like this that count on layers of flavor. It can be tempting to count on the combination of ingredients and dressing to make the dish work, while being a little sloppy with the preparation of each element. But this dish will really sing only if each part of it can stand on its own. Remember to include salt in the cooking – bland lentils or quinoa will be the fastest way to turn all your work into a disappointment.

Potluck Grain Salad

1/2 cup quinoa, cooked and cooled

1/2 cup millet, cooked and cooled

1/3 cup french green lentils, cooked and cooled

1/2 cup wild rice, cooked and cooled

1 sweet potato, diced

olive oil

salt

1/2 bunch flat leaf parsley, chopped

1/2 bunch scallions, chopped

1 handful nuts – pine nuts or almonds

fruity clear vinaigrette**

crumbled goat cheese (optional)

Preheat the oven to 450 degrees.

Cook the quinoa, millet, lentils and wild rice according to package instructions. Be sure to cook with a pinch of salt. Drain and cool.*

Meanwhile, peel and dice the sweet potato. Toss with a little olive oil and a pinch of salt. Spread on baking sheet and roast until tender. Cool.

Spread the nuts in a skillet and place in oven. Toast until golden. Cool.

Chop the scallions, including white and green parts. Chop the parsley.

Combine the quinoa, millet, lentils, wild rice, sweet potato, nuts, scallions and parsley. Add dressing, salt and pepper to taste to taste. Top with goat cheese if using.

*If you are pressed for time, spread on a baking sheet and place in the fridge for quicker cooling.

**I like to dress salads like this with a vinaigrette made with white balsamic. The color of regular dark balsamic will detract from the looks of this dish.

Black Lentil Dal

Black lentil dal ingredients
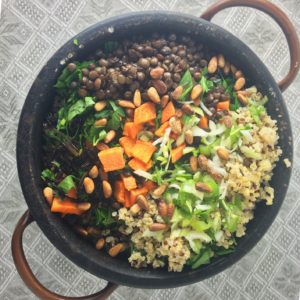
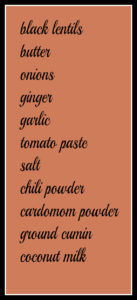
I have a few general ‘food rules’ I try to follow, things I’ve found are pretty much guaranteed to make me feel healthy. One of those rules is to eat legumes in some form every day. I came to rely on legumes first because I found they were so good at helping to keep my blood sugar (and therefore my energy and mood) steady. But I don’t complain that they are also cheap, store easily, take spices and flavors beautifully, and introduce me to cuisines from all over the world.

I feel well-prepared for any week if it starts with some sort of lentil soup as well as a container of homemade hummus in the fridge.

This recipe is adapted from Meera Sodha’s Made in India. I actually started off making it by the book. I was weirdly proud of myself for pulling out the measuring spoons. Until I realized I wanted more spices (there’s a life motto – more spice!) and I would be swapping the dairy milk for coconut milk anyway. So who am I kidding – Following a recipe is just not for me.

Improvisation aside, this recipe is not about spontaneity. You have to soak the beans, boil the beans, and simmer the dal. Plan to start the actual cooking 2 1/2 hours or so before you want to eat, though most of the time is unattended. Or do as I often do with long-simmering dishes. Get the pot on the stove, make something else for dinner, and by the time you’ve eaten and cleaned up, tomorrow night’s dinner* will be finished. Love cooking or not, most of us just don’t have time to do it every night!

Black Lentil Dal

4 servings

7 ounces urad dal(black lentils)
4 tablespoons butter, divided
1 onion, diced
1 inch piece of ginger, finely chopped
5 cloves of garlic, crushed
3 tablespoons of tomato paste
1 teaspoon salt
3/4 teaspoon chili powder
1/2 teaspoon cardamom powder
1/2 teaspoon ground cumin seeds
3/4 cup coconut milk

The night before you are to make the dish, soak the lentils. Rinse the lentils well and place in a large bowl. Cover with water and soak overnight or up to 24 hours.

Rinse and drain the soaked lentils and put in deep pan. Cover with water and bring to a boil. Leave at a low boil for 45 minutes, skimming the water as necessary.

While the lentils are boiling, put 3 tablespoons butter in a skillet over medium heat. When the butter begins to foam, add the diced onions. Cook them slowly for 15 minutes. Add the ginger and garlic. Cook a further 5 minutes or longer, being careful not to burn. Add the tomato paste, salt, chili powder, cardamom, and cumin. Stir and remove from heat.

When the lentils have boiled, drain off most of the water, leaving just enough to cover. Add the tomato and onion mixture. Add the coconut milk. After bringing to a boil, lower the heat and simmer, stirring occasionally for 1 and a half hours. Add more coconut milk if necessary to keep the lentils from boiling too dry.

Adjust the salt and spices to your taste. Add 1 tablespoon butter just before serving and stir.


*Try freezing the dal as well. I can’t promise success since I haven’t had a chance to defrost and eat mine yet, but I find lentil dishes freeze very well.

Hummus joy

hummus ingredientsWhen it comes to either/or questions I try to remember first to question the question. Why should I choose one or the other? Form or function? Yes please. Republican or Democrat? No thank you. Healthy or tasty? Of course.

Hummus is the proof you don’t have to choose. Tasty enough to make an afternoon break with vegetables something to look forward to and packed with protein and fiber, hummus fills both sides of the equation with flair. Flexible enough to dress up with any number of spices or flavors, it’s also incredibly cheap to make and freezes so well that the slight inconvenience of planning ahead to soak the beans is more than made up in the ease of making and storing a large batch. Though if you are in a hurry, hummus made with canned beans still out-performs the store-bought stuff any day.

hummus | asavoryplate.com

Hummus to me is bound up with a memory of making batch after batch in a sunny kitchen with only a mini food processor while my roommates and friends sat around the table eating it with lime chips and laughing. At the time I improvised my hummus recipe but for some reason was intimidated to use anything other than canned beans. Since then I have been converted to using dried beans and experimented with different techniques and flavors, throwing in dill or paprika, using freshly toasted and ground cumin, sometimes roasting my garlic. I even tried peeling the chickpeas (Yes, peeling the chickpeas gave me a lovely creamy hummus. No, it was absolutely not worth the hassle). There is always homemade hummus in the freezer.

When my friends ask for my hummus recipe I want to tell them to just look at the ingredients list and pull out their food processor – it’s that easy to figure out. But if you would like to have more specific guidance, check out these two recipes. You can’t go wrong.

Try this hummus

And then try this hummus


Perfectly pressed tofu

I was recently accused of  having perhaps too many kitchen tools. I’m not sure whether or how to defend myself. Ok, ok, I have way too many bread-rising baskets for someone who hasn’t made a loaf of bread in at least a year. But when it comes down to it I think it’s awfully hard to have too many spatulas, or colanders for that matter. The right tool for the job always makes the job twice as fast and twice as fun. That’s a fundamental rule for life, not just the kitchen.

panang curry with tofu and veggies | asavoryplate.com
tofu, carrots, snow peas, purple kale and panang curry

I’ve been eating a little more tofu lately. I love the way it takes in flavors. And that it cooks up so quickly to a filling meal. I do a version of this bun vermicelli bowl with tofu because it’s amazingly tasty and lends itself to prepping ingredients ahead for the week. Tofu recipes tell you to press it so I thought I was doing right by my tofu by giving it a squeeze between a couple of tea towels. Then I ran across the concept of a tofu press and realized I’ve been neglecting my tofu prep.

So yes, enter yet another tool for my overstuffed tiny kitchen. And it’s elevated my tofu from a convenient like to look-forward to love. Well-pressed tofu is toothsome and fries up with a nice crunch even faster that half-heartedly pressed tofu.

Tonight’s dinner was a quick tofu fry with lots of vegetables drizzled with the panang curry from a Thai restaurant doggie bag. It was lovely and filling and the kind of meal that makes you feel well-nourished. And since the tofu was waiting in its press in the fridge the meal took all of 15 minutes start to finish. That makes the tofu press a tool that has earned its place.


tofu with curry and vegetables | asavoryplate.com
tofu with curry and vegetables